Check out Sentinel for Linux, Windows, and OS X on GitHub
I recently got my roommate a Dream Cheeky Thunder USB missile launcher. It was fun to play around with for a bit, but the included software was very limited in its functionality. Just when I was ready to dismiss it as an overpriced toy, my roommate came up with a great idea: could we mount a camera to the turret and make it automatically aim and fire at faces?
After a couple weeks of experimentation, we came up with Sentinel, a Python script that does just that, making heavy use of the excellent OpenCV computer vision library. Here’s how we did it.
But first, a video demo!
Note: The above video was filmed while our computers were rather bogged down, and Sentinel usually runs signficantly faster than that (especially on Windows and OS X, where it can go as fast as 3 iterations per second).
Step Zero. The concept
The main loop of the program is conceptually quite simple:
while True:
   camera.capture()
   face_detected, x_adj, y_adj = camera.face_detect()
   camera.display()
   if face_detected:
      turret.adjust(x_adj, y_adj)
      turret.ready_aim_fire()
At each iteration, the camera takes a picture, which is then processed to detect any faces. If a face is detected, the turret adjust itself to bring the face closer to the center of the camera’s field of view. If the face is close enough to the center and the turret is armed, it then fires a missile at its target. The camera’s output is also sent to the screen, with an ominous red reticule drawn over a detected face.
Note: I’m only showing bits of pieces of our source code here, and I’m simplifying it where I can to keep the code chunks relevant. You can see the full source code here.
Step One. Assembling the hardware
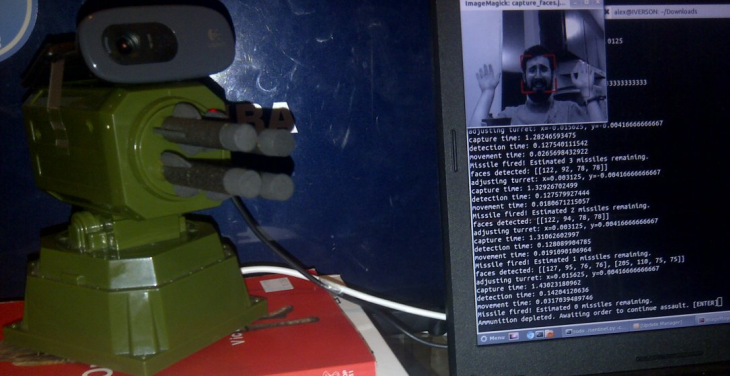
We had a small Logitech C270 webcam lying around, so we taped it to the top of the turret, aiming it roughly parallel to the trajectory of the turret’s missiles, as shown in the photo above.
The webcam’s position about an inch above the turret means that when the camera is pointing toward a target’s face, the turret usually ends up shooting them in the neck or chest, which is a nice side effect, since neither of us wanted to get shot in the eye.
Step Two. Controlling the turret
Controlling USB devices from Python requires the PyUSB library, which in turn needs a low level driver - we used libusb.
After that, connecting to a USB device is just a matter of finding its vendor and product IDs. In the case of this missile launcher, lsusb reported these IDs to be 2123:1010. In Linux, you also need to detach the kernel driver if it is active:
class LauncherDriver():
   # Low level launcher driver commands
   # this code mostly taken from https://github.com/nmilford/stormLauncher
   # with bits from https://github.com/codedance/Retaliation
   def __init__(self):
      self.dev = usb.core.find(idVendor=0x2123, idProduct=0x1010)
      if self.dev is None:
         raise ValueError('Missile launcher not found.')
      if sys.platform == 'linux2' and self.dev.is_kernel_driver_active(0) is True:
         self.dev.detach_kernel_driver(0)
      self.dev.set_configuration()
Now that the device is configured, we can send commands to it. Fortunately for us, others had already discovered the commands that the device accepts to position its turret, fire missiles, and toggle its built-in LED:
   def turretUp(self):
      self.dev.ctrl_transfer(0x21,0x09,0,0,[0x02,0x02,0x00,0x00,0x00,0x00,0x00,0x00])
   def turretDown(self):
      self.dev.ctrl_transfer(0x21,0x09,0,0,[0x02,0x01,0x00,0x00,0x00,0x00,0x00,0x00])
   def turretLeft(self):
      self.dev.ctrl_transfer(0x21,0x09,0,0,[0x02,0x04,0x00,0x00,0x00,0x00,0x00,0x00])
   def turretRight(self):
      self.dev.ctrl_transfer(0x21,0x09,0,0,[0x02,0x08,0x00,0x00,0x00,0x00,0x00,0x00])
   def turretStop(self):
      self.dev.ctrl_transfer(0x21,0x09,0,0,[0x02,0x20,0x00,0x00,0x00,0x00,0x00,0x00])
   def turretFire(self):
      self.dev.ctrl_transfer(0x21,0x09,0,0,[0x02,0x10,0x00,0x00,0x00,0x00,0x00,0x00])
   def ledOn(self):
      self.dev.ctrl_transfer(0x21,0x09,0,0,[0x03,0x01,0x00,0x00,0x00,0x00,0x00,0x00])
   def ledOff(self):
      self.dev.ctrl_transfer(0x21,0x09,0,0,[0x03,0x00,0x00,0x00,0x00,0x00,0x00,0x00])
Step Three. Controlling the camera
Now that we’ve set up the rocket launcher, the next step is accessing the webcam to make it take a picture once per loop iteration. We ended up doing this in a few different ways.
Linux: streamer
On Linux, I was excited to find streamer, a fast and simple-to-use photo/video capture tool. Even after we switched to using OpenCV’s photo capture capabilities on Windows, streamer still ended up giving the best performance on Linux.
# captures a single frame - currently a platform-dependent implementation
def capture(self):
   if sys.platform == 'linux2':
      # on Linux, use streamer to generate a jpeg, then have OpenCV load it into self.current_frame

      img_file = 'capture.jpeg'
      subprocess.call("streamer -q -c /dev/video" + self.opts.camera + " -s "
            + self.opts.image_dimensions + " -b 16 -o " + img_file, stdout=FNULL, shell=True)
      self.current_frame = cv2.imread(img_file)
Windows and OS X: OpenCV
Capturing photos on Windows proved trickier. Initially, we used CommandCam, which gave good results but was a litle too slow to use. We finally switched to using OpenCV’s image capture methods, but ran into a serious problem.
The images that OpenCV was processing were always a few frames out of date compared to the images the camera was taking, which ended up making the turret oscillate back and forth instead of homing in to its target, because it was adjusting its position based on outdated information.
This behavior is actually intentional in OpenCV: images are stored in a buffer and retrieved as quickly as possible, and the latest image taken is not generally the image retrieved. Since OpenCV is generally used in a situation where continuous footage is being taken from a video camera, this is not usually a problem. However, since we were taking only one picture at a time and then repositioning the turret based on each picture, this behavior was unacceptable.
Our solution was a little hackish but succeeded in correcting the problem: we simply made a clear_buffer method that repeatedly grabs images from the buffer until only the latest image is left, slowing the process down slightly but greatly improving the turret’s behavior:
# grabs several images from buffer to attempt to clear out old images
def clear_buffer(self):
   for i in range(self.opts.buffer_size):
      if not self.webcam.retrieve(channel=0):
         raise ValueError('no more images in buffer, mate')
The webcam is set up for use with OpenCV via self.webcam = cv2.VideoCapture(int(self.opts.camera)) within the Camera class’s initializer, and frames are captured like this:
# on Windows and OS X, use OpenCV to grab latest camera frame and store in self.current_frame

if not self.webcam.grab():
   raise ValueError('frame grab failed')
self.clear_buffer()

retval, most_recent_frame = self.webcam.retrieve(channel=0)
if not retval:
   raise ValueError('frame capture failed')
self.current_frame = most_recent_frame
We’re currently using OpenCV for photo capture in OS X as well, though it doesn’t seem to work as well as in Windows, so we’re looking for alternative tools we can use to capture photos from within the script.
Step Four. Face recognition with OpenCV
Once a photo is captured, it’s taken to OpenCV for face detection. A lot of things are happening in this method, so I’ve tried to annotate it as much as possible. draw_reticule is a helper method that draws targets of various styles.
def face_detect(self):
   # load image, then resize it to specified size
   img = self.current_frame
   img_w, img_h = map(int, self.opts.image_dimensions.split('x'))
   img = cv2.resize(img, (img_w, img_h))

   # initialize classifier with training set of faces
   face_filter = cv2.CascadeClassifier(self.opts.haar_file)

   # detect faces
   faces = face_filter.detectMultiScale(img, minNeighbors=4)

   # convert to grayscale then back, so that we can draw red targets over a grayscale
   # photo, for an especially ominous effect
   img = cv2.cvtColor(img, cv2.COLOR_RGB2GRAY)
   img = cv2.cvtColor(img, cv2.COLOR_GRAY2BGR)

   # sort faces by size (we only use the biggest face for adjusting the camera)
   faces.sort(key=lambda face:face[2]*face[3])

   x_adj, y_adj = 0, 0
   if len(faces) > 0:
      face_detected = True

      # draw a rectangle around all faces except last face
      for (x,y,w,h) in faces[:-1]:
         draw_reticule(img, x, y, w, h, (0 , 0, 60), "box")

      # get last face, draw target, and calculate distance from center
      (x,y,w,h) = faces[-1]
      draw_reticule(img, x, y, w, h, (0 , 0, 170), "corners")
      x_adj =  ((x + w/2) - img_w/2) / float(img_w)
      y_adj = ((y + h/2) - img_h/2) / float(img_h)
   else:
      face_detected = False

   # output the modified image so that we can display it
   cv2.imwrite(self.opts.processed_img_file, img)

   return face_detected, x_adj, y_adj
Step Five. Displaying the target
After OpenCV has detected any faces, we display the modified image (converted to grayscale, with red targets drawn over faces).
This method has a great deal of platform-dependent code, to make it play equally nicely with Linux, OS X, and Windows:
- In Linux, we open up ImageMagick display windows. These windows do not refresh automatically, so we kill any existing windows each time we open a new one.
- In OS X, we open a Preview window. Conveniently, calling
open -a Preview [path]refreshes the current Preview window. - In Windows, we open Windows Photo Viewer (this might not work in older versions of Windows). It refreshes itself automatically, so
we only open a window the first time
Camera.displayis called.
# display the OpenCV-processed images
def display(self):
   if sys.platform == 'linux2':
      # Linux: display with ImageMagick
      if self.current_image_viewer:
         subprocess.call(['killall', self.current_image_viewer])
      subprocess.call("display " + self.opts.processed_img_file + ' &', shell=True)
      self.current_image_viewer = 'display'
   elif sys.platform == 'darwin':
      # OS X: display with Preview
      subprocess.call('open -a Preview ' + self.opts.processed_img_file, shell=True)
      self.current_image_viewer = 'Preview'
   else:
      # Windows: display with Windows Photo Viewer
      if not self.current_image_viewer:
         viewer = 'rundll32 "C:\Program Files\Windows Photo Viewer\PhotoViewer.dll" ImageView_Fullscreen'
         self.current_image_viewer = subprocess.Popen('%s %s\%s' % (viewer, os.getcwd(),
               self.opts.processed_img_file))
Step Six. Aiming and firing
If a face is detected, the turret adjusts itself to try to bring the face into the center of its field of view. The Camera.face_detect method returns x_adj and y_adj, which correspond to the distance from the center of the most prominent face (expressed as a fraction of the total width and height of the photo, respectively). These values are passed to the Turret.adjust method:
# adjusts the turret's position (units are fairly arbitary but work ok)
def adjust(self, right_dist, down_dist):
   right_seconds = right_dist * 0.64
   down_seconds = down_dist * 0.48

   if right_seconds > 0:
      self.launcher.turretRight()
      time.sleep(right_seconds)
      self.launcher.turretStop()
   elif right_seconds < 0:
      self.launcher.turretLeft()
      time.sleep(- right_seconds)
      self.launcher.turretStop()

   if down_seconds > 0:
      self.launcher.turretDown()
      time.sleep(down_seconds)
      self.launcher.turretStop()
   elif down_seconds < 0:
      self.launcher.turretUp()
      time.sleep(- down_seconds)
      self.launcher.turretStop()
Note that the only way to move the turret a certain distance is to estimate how long the turret’s rotation would last and send it commands to move and stop with the appropriate timing.
Finally, Turret.ready_aim_fire detects if the face was close enough to the center of the camera to fire, turning on the turret’s LED as a warning before firing a missile (if the --disarm flag is passed to the script, the LED is turned on, but no missile is fired). Then the loop continues, until the turret has fired all four of its missiles:
# turn on LED if face detected in range, and fire missiles if armed
def ready_aim_fire(self, x_adj, y_adj):
   if face_detected and abs(x_adj)<.05 and abs(y_adj)<.05:
      turret.launcher.ledOn()
      if self.opts.armed:
         turret.launcher.turretFire()
         time.sleep(3) # roughly how long it takes to fire
         self.missiles_remaining -= 1
         print 'Missile fired! Estimated ' + str(self.missiles_remaining) + ' missiles remaining.'
         if self.missiles_remaining < 1:
            raw_input("Ammunition depleted. Awaiting order to continue assault. [ENTER]")
            self.missiles_remaining = 4
      else:
         print 'Turret trained but not firing because of the --disarm directive.'
   else:
      turret.launcher.ledOff()
Try it yourself!
If you have a Dream Cheeky brand USB missile launcher (though it wouldn’t take much work to support other brands of missile launchers), a compact webcam, and a desire to build your very own defense system for your home or workplace, check out our GitHub repository.
We’ve gotten Sentinel working on Windows, OS X, and several Linux distros, though installing the dependencies (OpenCV, PyUSB, and others, depending on platform) can take some work.
We’re currently hard at work on some more features, including:
- different modes of operation (such as a “sweep mode”, in which the turret continually pans until it locates a face, rather than staying idle when it doesn’t see a face)
- a “kill-cam” feature that stores the pictures that it takes right as it shoots a target
- easier installation of dependencies (especially on Windows)
Got any comments, questions, or suggestions? Be sure to let me know, either here or on Github.
Comments
blog comments powered by Disqus